M.2 SSD NAS Build and Benchmarking
Recently, I ran out of space on the 8TB of spinning rust sitting inside of my desktop computer. This disk houses an archive of all of my personal data and media files. Recently, and a major cause of my space issues, it is also now home to a large amount of my family’s home media. These files total nearly 3TB of high bitrate copies of home videos (a project to write up at another time)! Driven by the urge for more space, performance, and (although I do backup) safety from equipment failure, I turned my sights to building a network attached storage device (NAS).
I have experimented with building a personal NAS twice now: once in 2020 and another time in 2015. I am therefore right on time to build my third in 2025! History also dictates that I must scrap it for a simpler solution in two years. There are a few reasons why my previous NAS’s have not survived for long.
The first issue was their size and noise. I was in college and grad school during my previous NAS server builds. Because of this, I was highly budget constrained and constructed them from cheap HPE servers sourced from ebay and used spinning disks. The second iteration of these was at least in a desktop form factor, but still had audible fan noise that I easily noticed from the bed in my studio apartment.
Software was also an issue. In the past when I had more time, I rolled my own NAS servers using my preferred flavor of linux at the time with a Samba and NFS server backed by ZFS for the filesystem. These systems all worked well at the start and taught me a lot about Linux. However, any system requires regular maintenance and at some point I would end up with conference or paper deadlines to deal with and managing updates through Arch Linux on yet another server became a nuisance.
The few final issues I had were that of power draw and performance. Running a linux server 24/7 is not free and now that I live in California, it is even less free than it used to be. In terms of performance, spinning disks have noticeable issues with latency. Even on the 8TB disk in my desktop computer, a directory can take several seconds to display its list of files within Windows if the drive is sleeping. Since it is an archive disk, this is its default state.
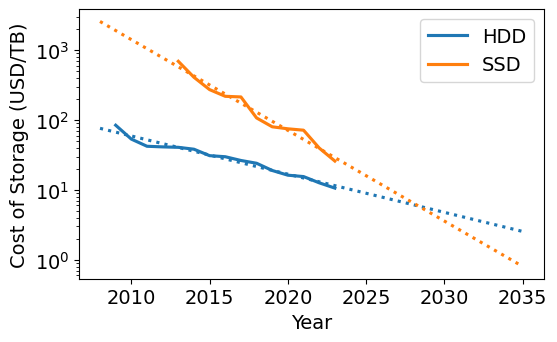
With all of these past issues, I decided that I highly value (in order), noise, size, power draw, and performance. I felt like I was a prime candidate to build a NAS using solid state drives (SSDs) that have been dropping in price recently. The M.2 form-factor was particularly attractive due to its size. Below I plot the historic price of storage for spinning disks (HDD) versus SSDs. Interestingly, if trends continue, SSDs should overtake HDDs in cost within the next decade. Data is from Our World in Data John C. McCallum (2023); U.S. Bureau of Labor Statistics (2024).
Before going on, I should address that if cost is at all important to you, building an NVME M.2 NAS is a silly thing to do. I will never see the full speed of the drives over my 1GB home networking. The cost difference in 2025 will never make sense from a power consumption standpoint. The whole point of going this route (for me anyways) is the luxury of having the smallest possible server and having it sit silently on my desk serving files.
For the rest of this post, I will talk about my process of building the NAS, and its final performance.
Planning out the NAS
Drives
After a quick review of what drives are out there, I ended up with this table.
| Drive | Price ($/TB @ 4TB Drive) | Write Endurance (TB) | Read Speed (TB/s) |
|---|---|---|---|
| WD SN700 | 100 | 5100 | 3.4 |
| WD SN7100 | 50 | 2400 | 7.2 |
| Seagate FireCuda 530 | 100-150 | 5050 | 7.3 |
| Samsung 990 Pro | 75 | 2400 | 7.4 |
| WD SN850X | 75 | 2400 | 7.3 |
I was able to quickly exclude read speed as a selection criteria because it will always be much faster than my network’s speed. To gauge my need for write endurance, I used the tool HWInfo64 to query how much data has been written in the lifetime of my current archive disk. Over its lifetime of three years, I have only written 37TB to it. This resulted in the surprising conclusion that even if I compressed that usage into a single year, this NAS could have a ten year lifetime and only hit 10-20% of the rated lifetime of any drive in the table. I felt confident that even with write amplification from the use of the ZFS filesystem, all of these drives are “good enough” for my application and I could go with the cheapest: the WD SN7100.
I ended up purchasing six of the 4TB WD SN7100 disks for a total of 24TB of raw storage.
Server
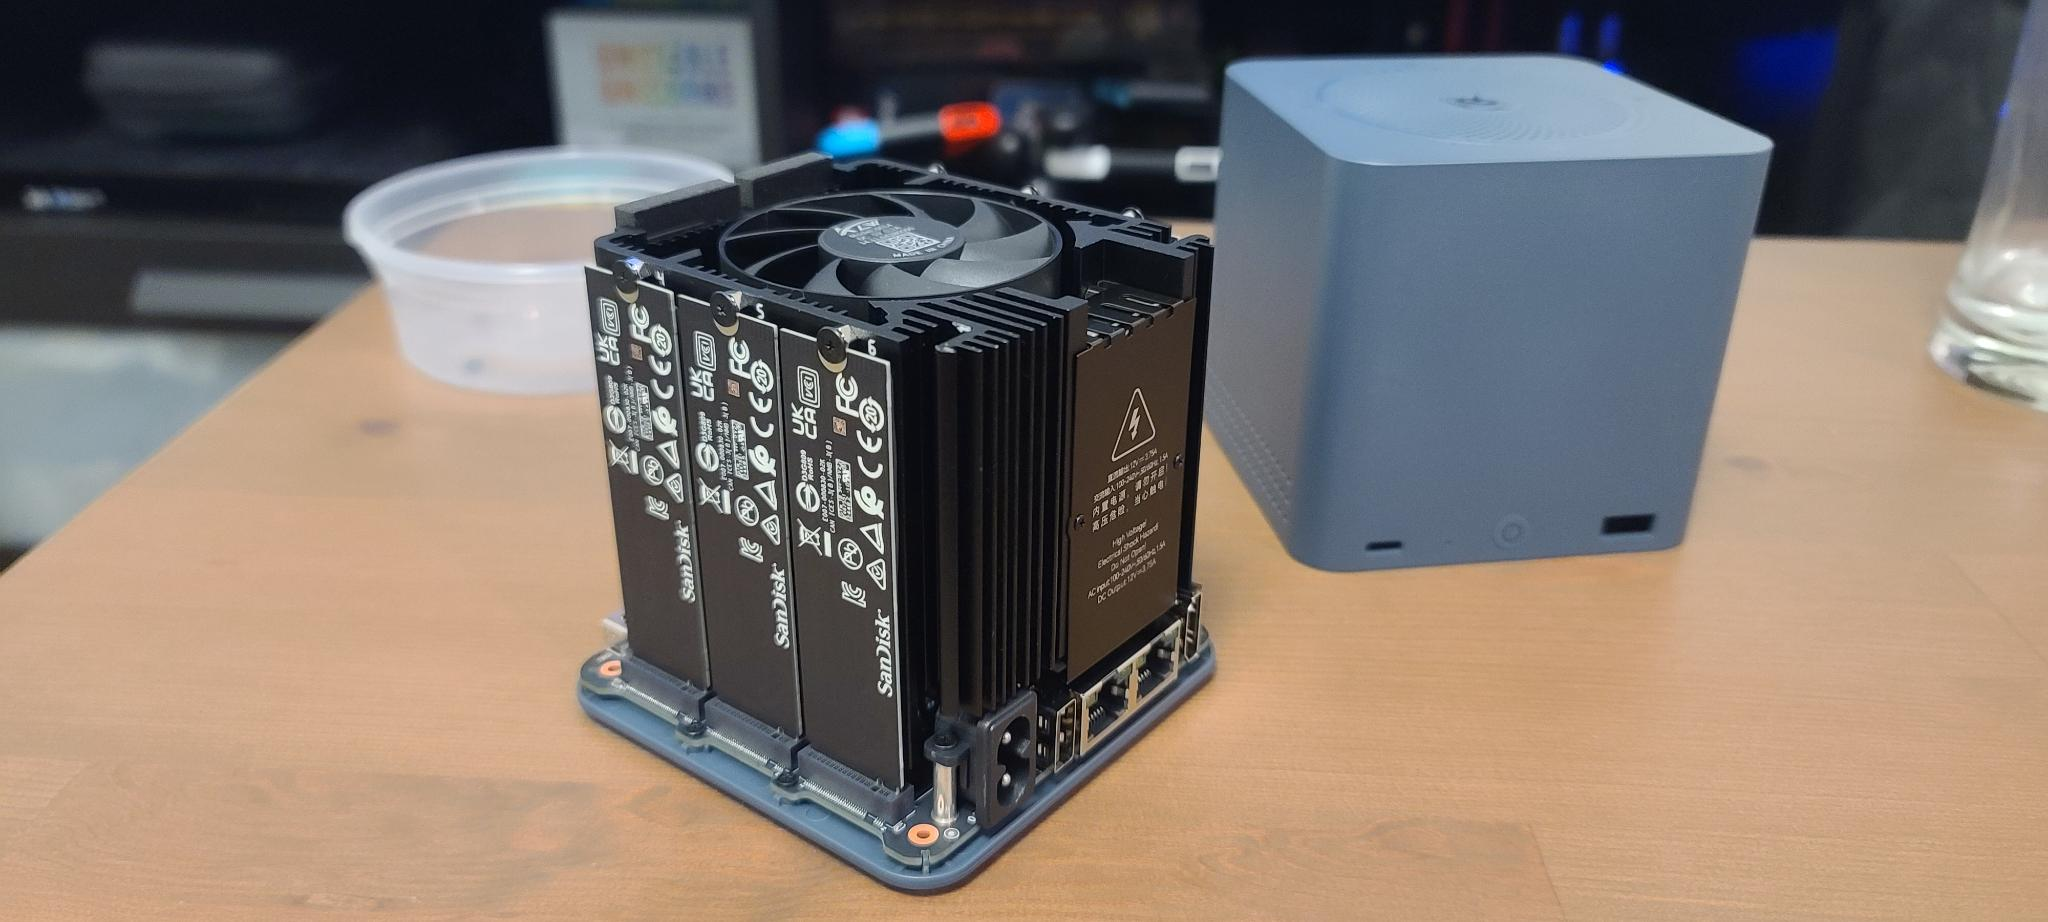
For the server, there seems to have been an explosion of cheap small form factor computers from a variety of companies. One particularly appealing unit was the Beelink ME Mini N150. Its “trashcan” mac form factor supports six NVME M.2 drives while remaining tiny and still having an integrated power supply. The only thing I really wished it had was 10GB networking in case I upgrade in the future. I initially purchased this computer, but unfortunately had to return the item after I experienced issues with the drives disconnecting under load. From forum posts and blogs (here, here, and here), I expect this was due to power issues, but I will leave it to those sources to discuss it in more detail. The folks at Beelink support were friendly and were able to process a return after explaining the issue to them.
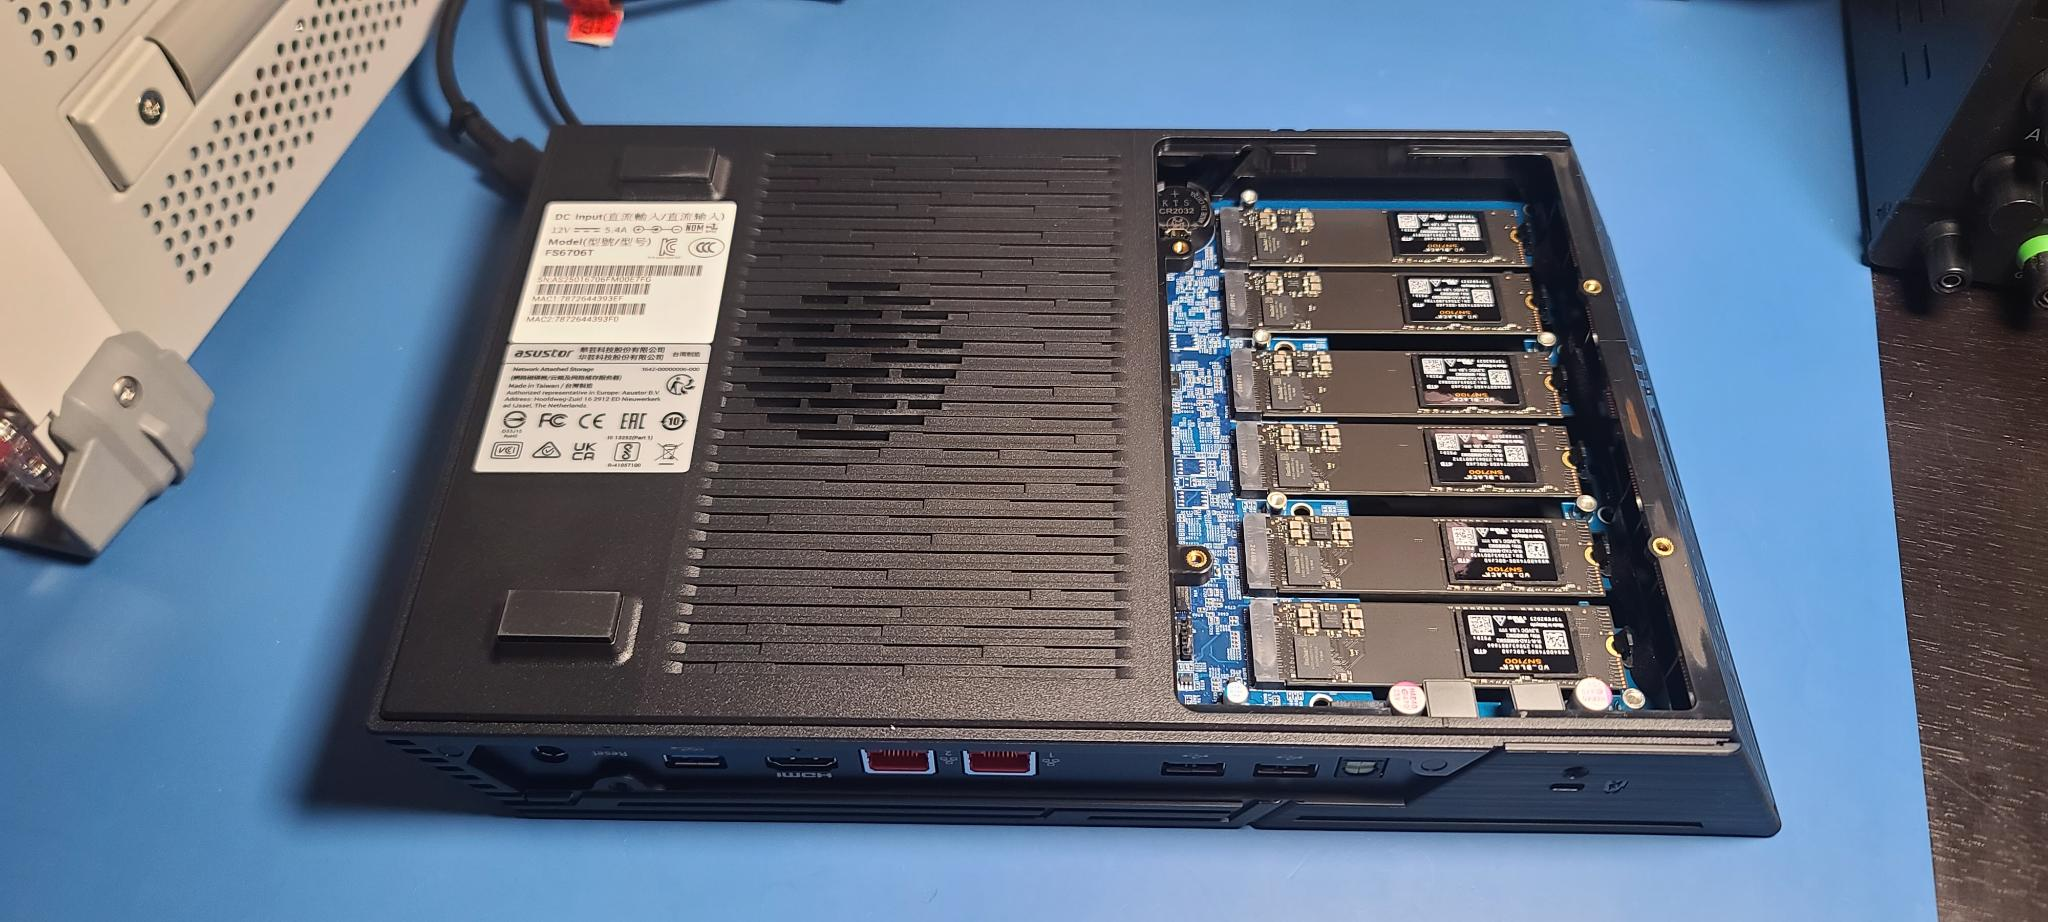
After this initial foray into mini-computers, I ended up with the Asustor Flashstor 6 (FS6706T). Asustor is a division of Asus and as I am currently typing this post out on one of their laptops that I am quite happy with, I thought I would give it a shot. This server comes with a slightly older CPU than the Beelink and is slightly larger (about the form factor of a PS2) and has an external power brick. However, it supports all of the NVME M.2 drives I had already purchased at this point and has a quite low power draw and claims to be completely silent.
Besides the base server, I also opted to purchase optional heatsinks for the NVME drives. These are sold separately by Asustor and are designed specifically for the Flashstor. I also bought 8GB of RAM to upgrade the server. These are just laptop-style DDR4 SODIMMs which can be easily purchased from the usual vendors and Asustor has a good compatibility chart online.
Here is a comparison table with just the final units I ended up with as there are otherwise too many to fully populate.
| Device | Price (USD) | Power Draw (W) | CPU Cores/Threads | RAM (GB) | Network | NVME Slots |
|---|---|---|---|---|---|---|
| Beelink ME Mini N150 | $329 | 6-30W | 4C/4T (Intel N150) | 12 GB LPDDR5 | 2x 2.5G | 6x M.2 (2230/2242/2280) |
| Asustor FS6706T | $450 | ~20W | 4C/4T (Intel N5105) | 4 GB DDR4 | 2x 2.5G | 6x M.2 2280 |
Software
For software, TrueNAS and Unraid seem to be the popular choices. With my existing biases towards the ZFS ecosystem, TruesNAS was the obvious choice. As a note for myself: I was initially confused by the options available from TrueNAS and the naming of their software. It seems that they are currently going through a rebranding as TrueNAS Core is no longer getting new features and TrueNAS Scale has been renamed to TrueNAS Community Edition (CE). Many posts online refer to the old names still.
Note: the Asustor Flashstor does come with Asus’s own NAS software called ADM. However, at the point I switched NAS’s I had already settled on TrueNAS for software and I prefered the ZFS ecosystem and kept it.
NAS Performance
The NAS went together quite easily. As noted in some of the reviews, the fans on removable pieces of the case are wired using USB connectors mounted to the panel which I though was funny, but appreciated the creativity. I added the optional heatsinks and swapped out my RAM for the upgraded amount.
For software, Jeff Geerling has an excellent note on installing TrueNAS on the Flashstor. The device does have eMMC memory that can hold an operating system, but at only 8GB, I opted to follow his approach of using a fast external USB drive to hold the software. Installing TrueNAS CE onto it went smoothly and all disks immediately showed up in the web interface.
I had some options ahead of my related to the drive layout. RAID is not a replacement for backup. However, it does offer some protection that I appreciate. The ZFS filesystem offers several RAID equivalents. I wanted to test their performance on writing, scrubbing and rebuilding of the array in the case of single drive failure. Partly for the purpose of the present decision, but also as an experiment to better understand the tradeoffs in RAID options. My initial worries were related to the CPU usage of RAIDZ1/2 and if it would affect my write performance. Especially on a low-power processor.
To understand the performance of the system, I wrote 8TB of zeros to the array while monitoring speed. This was done from a bash script on the NAS itself that generated many ~1GB files. Compression was turned off on the array. The average write speeds are written in the table at the end of this section, but they don’t capture the interesting “spikey” behavior of the drives. The array would occasionally drop in speed significantly and recover. I plotted the histogram of these events below.
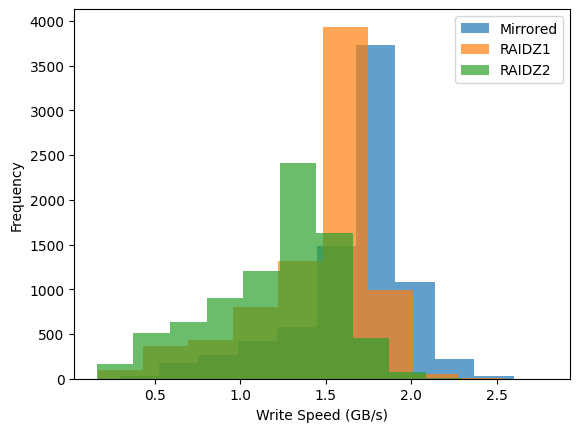
I spent a small amount of time debugging the performance drops as I was initially worried it was a CPU issue. However, the drops did not correlate well with CPU usage. They did, however, correlate with the io_wait statistic in linux which indicates that the system is waiting on the disks which are the likely culprit. However, I am still getting speeds faster than my network (note gigabyte not gigabit in this plot) and this doesn’t matter.
For each of the layouts, I also initiated a scrub after writing the 8TB of data and timed how long it took. I then would remove one of the drives and force the array to rebuild and time it. For the curious, this is the right set of commands to remove a disk from a pool, make ZFS forget about it, then add it back. This feels like an uncommon thing to do.
truenas_admin@truenas[~]$ sudo zpool offline my_pool <YOUR DISK ID>
truenas_admin@truenas[~]$ sudo zpool labelclear -f /dev/nvme0n1p1
truenas_admin@truenas[~]$ sudo zpool replace my_pool <YOUR DISK ID> /dev/nvme0n1p1
truenas_admin@truenas[~]$ sudo zpool status my_pool
All of my results are in the table below. I include the times taken to rebuild the 8TB of data as well what they would be if I used the entirety of the array.
| Drive Layout | Space (TiB) | Avg. Write Speed (GB/s) | Scrub Time, 8TB (min) | Rebuild Time, 8TB (min) | Rebuild Time Estimate, Full (min) |
|---|---|---|---|---|---|
| Mirrored | 10.75 | 1.8 | 90 | 60 | 83 |
| RAIDZ1 | 17.30 | 1.6 | 60 | 53 | 117 |
| RAIDZ2 | 14.40 | 1.2 | 64 | 67 | 124 |
It was interesting to me that the scrub time for the mirrored array was the worst of the three layouts tested. My interpretation of the data is that all of the scrubs were bottlenecked by the read speed of the drives. The mirrored array must read more data (two full copies, one from each disk) compared to the other layouts (one copy of data and one hash) which makes it slower. This helps assuage my fears of a CPU bottleneck.
The rebuild time for the mirrored array was the fastest, but only because it was the smallest amount of storage. The actual rate of rebuilding doesn’t vary much across the layouts and is probably just the write speed of the drive that was replaced.
Based on this new information, I made the decision to use RAIDZ2 for my NAS. I understand that NVME drives are highly reliable and I will likely never see a failure in the array let alone two. However, I am storing important data on them for myself and now copies of my family’s photos and videos. 14 TiB is enough space for my needs for a while and it is nice knowing how unlikely it is for a hardware issue to take it out.
After using the new NAS for a couple of months now I feel like it has lived up to expectations. It is even more responsive than the hard drive it replaced. I have experienced no performance issues with it even on my 1GB network. I can even play my high bitrate archival copies of family videos off of the networked storage directly. I haven’t heard the server’s fans at all and it’s small enough to sit just under my computer monitors.
Power Draw
I also connected the NAS to a power meter and let it run under my typical load for about a month. The average power draw ended up being 15.7W, roughly in line if not a little better than what I was expecting going into the project.
Lessons Learned
I will finish off this note with a couple of takeaways from this project.
- Consumer SSD write-endurance is more than enough for my consumer-grade application. Don’t spring for the more expensive drives.
- I was overestimating the CPU usage of RAIDZ1 and RAIDZ2 by a lot. Scrub and rebuild times appear to be dominated by the speed of the drives. Notably, the mirrored scrub was the slowest due to the cost of reading the full data of both disks instead of one copy of the data and a hash (or two).
- I wish someone would make a small M.2 NAS box with 10GbE and onboard MMC big enough to house TrueNAS.
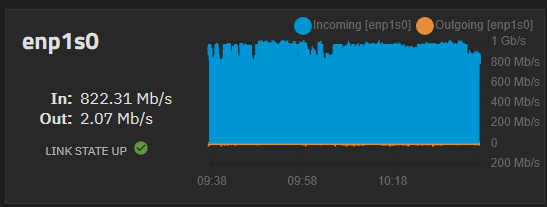
I will end with a fun picture showing saturating my home network while copying my data over to it.